
The Step-by-Step Process of Asphalt Paving and What to Expect During Installation
Asphalt paving is a crucial part of creating durable and smooth roadways, driveways, and parking lots. Whether you’re planning to repave your driveway or manage a large commercial project, understanding the process can help you stay informed and make better decisions. The installation of asphalt is a detailed and precise job that requires careful planning and expert execution. From site preparation to the final sealant, each step plays a role in ensuring that the surface remains smooth, long-lasting, and able to withstand various weather conditions.
In this post, we’ll walk you through the 8 essential steps of asphalt paving, explaining what to expect at each stage. Whether you’re new to paving or looking to learn more about the process, this guide will provide valuable insight to help you navigate your asphalt installation project with confidence. Let’s dive into the steps.
Site Preparation and Inspection
The first step in the asphalt paving process is preparing the site. This includes clearing the area of debris, vegetation, and old pavement, ensuring a clean surface for the new asphalt. Contractors will inspect the soil condition to assess the need for any grading or drainage adjustments.
Proper grading is crucial to ensure that water flows away from the paved surface and prevents future erosion. The inspection also helps identify any underlying issues that could affect the integrity of the new pavement. Once the site is clear and level, the team will mark the boundaries for paving.
To ensure the highest quality work, it’s important to work with experienced professionals who specialize in every step of the process. As highlighted by the team behind Sommerset Paving, these experts are well-versed in proper site inspection and preparation techniques, ensuring that the foundation for your paving project is solid and reliable from the start. Their professional approach minimizes the risk of issues down the line, such as poor drainage or uneven surfaces, which can compromise the longevity of the pavement.
Excavation and Grading
Excavation and grading are critical steps in the asphalt paving process. Excavation involves removing the top layer of soil to make room for the new asphalt. This step is necessary to achieve the proper base thickness for stability and load-bearing capacity. After excavation, the grading process begins to create a smooth, uniform surface that facilitates efficient drainage.
Ensuring that the paved surface slopes away from your house and other structures helps prevent water from pooling, which can lead to surface damage over time. Proper grading helps avoid common issues such as puddling, erosion, and cracks. It’s also essential that the grading meets local regulations and standards for safety.
Compaction of the Base
Before the asphalt can be laid, the base needs to be compacted. A well-compacted base ensures the new surface will be stable, durable, and resistant to future wear and tear. This step involves using heavy machinery like rollers to press down the soil or gravel layer beneath the asphalt. Compaction enhances the load-bearing capacity of the base and reduces the risk of settling or shifting over time.
A compacted base also improves the bonding between the layers of asphalt and ensures a smooth finish. Contractors will often test the compaction levels to ensure they meet industry standards, preventing any future issues with the paved surface.
Laying the First Layer of Asphalt
Once the base is ready, the first layer of asphalt, also called the binder layer, is laid down. This layer acts as the foundation for the final top layer, providing stability and strength. The binder layer is typically a thicker, coarse mixture that can withstand heavy loads and resist wear. The asphalt is delivered by trucks and spread evenly across the surface using specialized equipment like a paving machine.
The material is then compacted to ensure an even thickness and smooth texture. This layer also helps to bond with the underlying base, creating a solid foundation that will support the final layer of asphalt. Proper installation of the binder layer is essential for long-term durability.
Laying the Top Layer of Asphalt
The top layer of asphalt, or the wearing course, is the final layer that gives the surface its smooth, finished appearance. This layer is typically made from finer aggregates and is designed to provide a durable, smooth surface that can withstand the wear and tear of daily traffic. The top layer is carefully spread and compacted to ensure an even, smooth finish that provides excellent traction.
It also enhances the aesthetic appeal of the pavement, giving it a clean, professional look. The thickness of the top layer depends on factors such as the expected traffic load and climate conditions. Contractors must ensure the surface is properly sealed and free from imperfections, as the top layer directly impacts the pavement’s longevity.
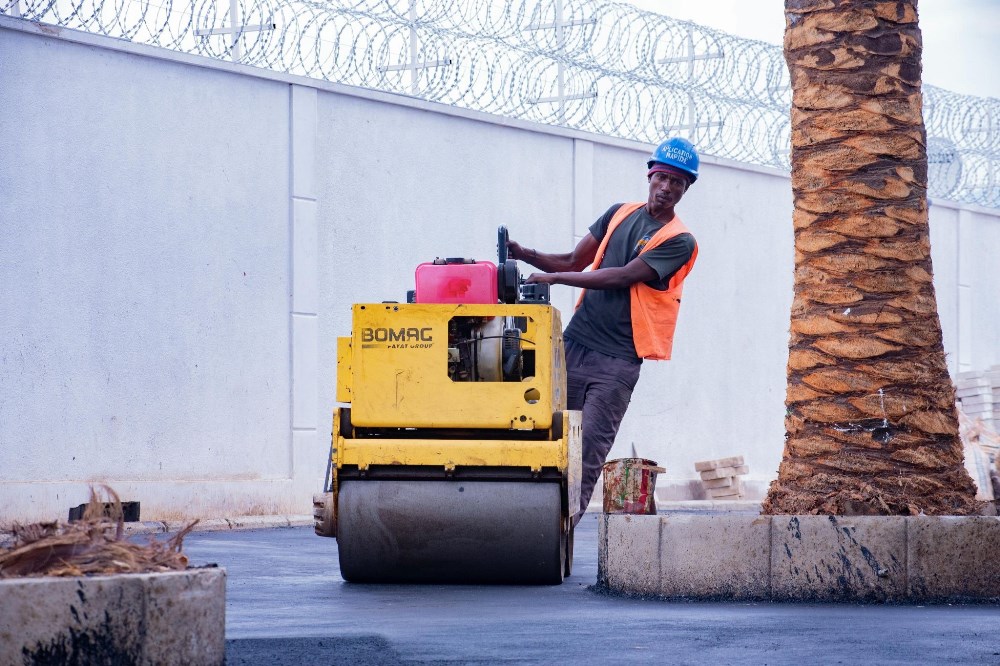
Compaction and Smoothing
After the asphalt has been laid, the compaction process is repeated to ensure that the pavement is smooth, even, and solid. Heavy rollers are used to compact the asphalt while it is still hot, which helps eliminate air pockets and ensures the material bonds well together. This process is essential to create a durable, high-quality surface that will stand up to weather and traffic over time.
Any inconsistencies or bumps that occur during the installation are smoothed out at this stage. The smoothness and levelness of the surface are crucial for both the aesthetic appeal and functionality of the asphalt. Compaction also ensures that the pavement has the correct density, which increases its strength and longevity.
Curing and Cooling
After the final layer of asphalt has been applied and compacted, it needs time to cure and cool. During this stage, the asphalt gradually hardens as the temperature lowers. Curing ensures that the material fully sets and becomes strong enough to support traffic. The cooling process typically takes several hours to complete, depending on weather conditions.
During this time, it’s essential to keep vehicles off the surface to allow it to set properly. If the asphalt is disturbed during the cooling process, it can lead to imperfections or damage. While the surface is curing, contractors will also check for any issues that need to be addressed before the pavement is ready for use.
Sealing and Maintenance
Once the asphalt has fully cured, a sealant is applied to protect the surface and extend its lifespan. Sealcoating provides an extra layer of protection against elements such as UV rays, water, and chemicals that can degrade the asphalt over time. This layer also enhances the pavement’s appearance, giving it a glossy, fresh look.
Regular maintenance is essential to keep the asphalt in optimal condition. Routine inspections, crack sealing, and resealing every few years can help prevent major damage and maintain the pavement’s functionality. By investing in proper maintenance, you ensure that your asphalt surface remains durable, smooth, and attractive for years to come.
Asphalt paving is a detailed process that requires careful attention to each step, from site preparation to the final sealant. By understanding the stages involved and working with skilled professionals, you can ensure a smooth, durable, and long-lasting result. Each phase, from excavation to compaction and curing, plays a critical role in the quality of the finished surface. Regular maintenance further extends the life of your pavement, keeping it in optimal condition for years to come. Whether you’re paving a driveway or a commercial lot, following these steps will lead to a successful paving project.


